FAQ
Do you have a question about your gauge?
Is your modem flashing red? What should I do?
Depending on the number of consecutive flashes, the cause of the problem may vary:
- If the LED flashes once
-
If the red LED flashes once, the modem has not received a signal from the gauge for 6 hours. Please replace the battery.
-
- If the LED flashes twice
-
If the router doesn't recognize your modem, it's probably a problem with the Internet box. Is it possible to change the RJ45 output?
What to do:
- disconnect the modem
- Reconnect the modem to another rj45 socket (+ reconnect power)
-
- If the LED flashes three times
-
If your IP address is invalid
Are you using a secure network? It's possible that the modem's IP is blocked by your network (especially in work environments). In this case, to find out the modem's IP, use the command: "ping M4KE-XXXX", where XXXX is your modem's reference number. It is possible to disable the modem's DHCP behavior
-
- If the LED flashes four times
- The Fullup servers are currently undergoing maintenance. Please try again later.
- If the LED flashes five times
- The Fullup servers are currently undergoing maintenance. Please try again later.
- If the LED flashes six times
-
A firmware update has failed, please press the black button to restart the system.
Here's an explanatory video: https: //www.youtube.com/watch?v=8XyiIN8_Uoc
-
- If the LED flashes seven times
- Contact customer service

Data not validated
When your consumption curve contains certain ranges during which the gauge fails to detect an echo. This is why the consumption algorithm is unable to define consumption by period.
There are several things to check in this situation:
- Is the probe perfectly vertical to the liquid in the tank?
- The probe must be installed flush with the tank
- The probe must be installed > 10cm from the edge or any obstacle.
- This is an ultrasound that measures the distance between the bottom of the probe and the liquid level. In your case, there seems to be a lot of disturbance under the ultrasound (pipes running, reinforcements in the tank, installed near the edge of the tank, etc.).
- Could you check that there are no droplets under the gauge, which would disrupt the ultrasound.

Battery change
The problem you are experiencing can be solved by changing the probe battery (recommended by the manufacturer VARTA 3-volt CR2430 Lithium cell).
I advise you to screw the probe back in and replace the gasket.
Here's a video explaining how to change a battery.
https://www.youtube.com/watch?v=BBXQqZWg9Xw
Don't forget to reconnect the probe to the modem once you've changed the battery.
Here's how it works:
1) unplug the modem and plug it back in directly
2) place the black dot on the gauge against the black dot on the modem
3) the 3 LEDs will flash, then only the green LED will flash (probe measurement)
4) place the probe on your tank
5) only the orange LED will be steady.
Why doesn't my filling data update directly?
fullup products regularly read the level in your tank. The sensors wake up at regular intervals and evaluate the measured level. The level is sent to our servers, which check for any major anomalies. When our reliability index indicates that a fill is confirmed, the level is updated.
So there's always a slight delay between filling and updating the level on your application.
What to do if a fill is not displayed after 24 hours
Normally, a refill is visible in the application within a few hours. We wait until we have enough measurements to confirm the new level.
- If, after 24 hours, the level is still not correct even though your gauge is still connected, don't hesitate to contact our service department.
- If your gauge is no longer online, first check that you have internet access in your home, then contact our services.
- In some cases, it may be necessary to reset the gauge-modem pairing. To do this, please refer to the step-by-step instructions in this article.
What if the distance between the modem and the gauge is too great?
If the distance between your wifi box and the gauge is too great, or if there's electricity close to the tank site, you can use PLC repeaters. These repeaters allow you to repeat the Internet via your home's electrical cables. Once you've purchased your two PLC sockets, connect your internet box to the first internet socket. Next, go to the location near your cistern and plug the second PLC socket into an outlet. Connect the ethernet cable supplied to this socket. You now have a cable with internet near your tank. All that's left is to carry out the installation in the usual way, following the installation instructions.
Why are my data no longer taken into account?
When your consumption curve contains certain ranges during which the gauge fails to detect an echo. This is why the consumption algorithm is unable to define consumption by period.
Is the probe perfectly vertical to the liquid in the tank?
- The probe must be installed flush with the tank
- The probe must be installed > 10cm from the edge or any obstacle.
It's an ultrasound that measures the distance between the bottom of the probe and the liquid level, in your case there seems to be a lot of disturbance under the ultrasound (pipes running through, reinforcements in the tank, installed near the edge of the tank,...
Why does it say my tank is full when it isn't?
Your gauge communicates correctly with our servers, but measures a distance of less than 5 cm with a high level of interference. This is usually synonymous with an obstacle close to the sensor. This is why the value has not yet been validated.
Please check that there are no grooves/edges just below the sensor.
What should I do if the measurement is wrong on a plastic tank with reinforcement?
As you probably know, fullup products are fully compatible with rainwater tanks. They can be easily attached to them thanks to the different screw threads. In general, you won't need to make any modifications to install our products.
Some plastic tanks have a special design with reinforcements. These reinforcements give the tank extra strength and prevent deformation. Unfortunately, these reinforcements also create obstacles for the ultrasonic sensor - the mounting sleeve is located directly above them.
What to do in this case?
If you find that the sensor measures the distance to the recess, we recommend the following solution:
- Obtain a 1 1/4 (inch) diameter hole saw
- Use the hole saw to drill through the tank at a point that is not above a recess.
- Secure the probe with two screws drilled through the plastic tank.
- All done.
What is the minimum distance your ultrasonic products can measure?
Ultrasonic sensors have the advantage of being easy to install and precise. They operate using sound waves (ultrasound).
The minimum distance reliably measured by ultrasonic sensors is usually around 25cm.
Why is this? The measured distance is calculated on the basis of the echo. When the distance under the gauge is short, the echo may be observed even before the probe starts listening, or it may present so much interference that measurement is complicated. This is known as the blind zone phenomenon inherent in ultrasound technology.
Will my tank be compatible with the FullUpsystem ?
The probe has been designed to be compatible with most tanks. It is to be screwed flush with the tank. Several adapters are supplied with the gauge: 2″, 1″ 1/2 and 1″ 1/4.
For underground tanks, the gauge is not suitable for those that do not have direct access to the tank and do not have a place to screw in the gauge. Go to the "Is my underground tank compatible" section for more information.


Do I need professional help to install the gauge?
No, if your tank has a place to screw in the gauge, no plumber, heating engineer or electrician is required to install the gauge.
However, if welding work is required to adapt your tank, please contact us and we will put you in touch with one of our partners.
Click here to discover how to install the FullUp gauge in video!
Will I be able to monitor my consumption?
Yes, FullUp allows you to know your weekly consumption via the application!
https://app.fullup.be/#!/home

How do I calibrate the gauge to my tank?
When you install the application, you need to enter the specific dimensions of your tank. For users of underground tanks, please refer to the section "How can I install FullUp on my underground tank if I don't know its dimensions".
Does the gauge warn me when my tank level is low?
Yes, via the mobile application you will receive notifications as soon as the level falls below a certain threshold that you set.
Can my oil deliveryman come and deliver oil automatically when my tank is low?
We are already working with a few oil delivery companies who automatically deliver to their customers using FullUp, contact us for more information.
Is my underground tank compatible?
Check that there is a place on the tank where you can screw the probe. The gauge is screwed flush to the tank and cannot be placed on a pipe. If you install the gauge on a pipe, the measurements may be wrong. Here are some pictures where the installation is possible.
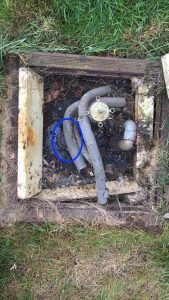
The modem receiver should be placed inside the house and at a height above the tank with the antenna pointing towards it. The unobstructed communication between the gauge and the receiver is 150m. Depending on the number of obstacles and the insulation of the house this may vary.
How can I install FullUp on my underground tank if I don't know its dimensions?
It is very simple! All underground tanks are cylindrical, as they are more resistant to stress.
All you have to do is:
1. Place a meter to the bottom of the tank to calculate the diameter
2. Fill in the volume and diameter in the application!
If you don't know the exact volume, a calibration is possible at the next filling!
Export tank data
Go to your control panel: https: //dashboard.fullup.be
This export is performed via the button on the right of your graph, click on the graph icon Click on the XL icon. The generated csv contains the measurement history of your probe.
Here's a video to help you get started with your dashboard.
How can I get my modem probe to communicate through my firewall/secure box?
-
- The MAC address is the physical address of the product, so it doesn't change. To find it, use a tool such as https://www.advanced-ip-scanner.com/ to obtain the product's MAC address. Based on this MAC address, the router dynamically assigns an IP address to the product.
Download https://www.advanced-ip-scanner.com/, then launch a search. The software will display all the products currently present on your network. The Modem product distributed by Fullup is included in the Tekelek Europe Ltd. line.
You can then connect to your box/firewall and, depending on your infrastructure provider :
- Either open based on MAC address directly
- Set the IP address to be registered for this equipment (in this case, when the equipment identifies itself to your local network, it will always be assigned the same IP address).
If you don't know how to configure your firewall or box, contact your provider.
- The MAC address is the physical address of the product, so it doesn't change. To find it, use a tool such as https://www.advanced-ip-scanner.com/ to obtain the product's MAC address. Based on this MAC address, the router dynamically assigns an IP address to the product.
2. Choose a sensor with P2P communication (e.g. 2G, GPRS, sigfox)
- With this type of sensor, communication is independent of your local network. As a result, no configuration is required during installation. This is the solution we recommend for our professional customers. Contact us if you have any questions.
In this article, we've detailed the various solutions available to you if you have a secure network on which you can't get the modem to communicate.
* When connecting the white modem to your Internet box, the Internet network will automatically assign an available IP address.
Add the dashboard to your computer
You've created an account and now want easy access to the dashboard from your computer? It's easy to add an icon on your computer for one-click access. We'll show you how in just three clicks.
Google Chrome
- Open your Google Chrome application
- Rendez-vous sur l’adresse de l’application web. Le Dashboard est généralement présent sur dashboard.<votrefournisseur>.fullup.be ou dashboard.fullup.be
- In the url bar, a "+" button lets you install the application. Simply click on it, then select "install application". The application will open in a new window.
- On Windows, you can find the application by searching in the search bar. On Mac, you'll find the application in finder.
With the basic Android web browser
If you don't have Google Chrome, you can also follow a similar procedure by going to the default web browser. To do this,
- Open the web page on your device (PC or smartphone)
- Rendez-vous sur l’adresse de l’application web. L’application web est généralement présente sur dashboard.<votrefournisseur>.fullup.be
- Then select Install in Settings or in your address bar.
- Then exit your web browser. The icon is now on your telephone home screen.
Here's a link to help you make the most of your dashboard
https://www.youtube.com/watch?v=kkst6R10aQI
Questions
How do you create an application icon on your smartphone?
You've created an account on our web application and now you'd like to be able to access it easily from your phone? It's easy to add an icon on your phone for one-click access. We'll show you how in just three clicks.
Android & IOS
Google Chrome
- Open your Google Chrome application
- Rendez-vous sur l’adresse de l’application web. L’application web est généralement présente sur app.<votrefournisseur>.fullup.be
- Then select the options to the right of the url bar (push on the three small dots); select "add to homepage" and add the shortcut to your phone's homepage.
- Then exit your web browser. The icon is now on your telephone home screen.
With the basic Android web browser
If you don't have Google Chrome, you can also follow a similar procedure by going to the default web browser. To do this,
- Open your smartphone's web application
- Rendez-vous sur l’adresse de l’application web. L’application web est généralement présente sur app.<votrefournisseur>.fullup.be
- Then select the options at the bottom of the menu bar. Select "Add page to", then indicate "Home Screen" and select "Add".
- Then exit your web browser. The icon is now on your telephone home screen.
With another browser
This article should help you add an icon to your Android screen, whatever browser you have installed.
Video explaining tank installation and encoding in the application: https: //youtu.be/43Y58WZPd1U
Installation: What do I do if my modem won't connect to the Internet?
If you are unable to connect your white modem to the Internet, please check the following points:
- Check that your Internet connection is working properly. Connect the Ethernet cable to a PC, for example, and check that you have Internet access.
- Check that the Ethernet cable has been correctly connected to the white modem.
- Check that the modem's power cable is firmly attached: the modem is equipped with LEDs. If any of them are lit, your modem is underpowered.
- Check that the white modem antenna has been screwed on securely
- Check that you have noted the Fullup modem reference in the application. This reference is located on the underside of your modem, near the bar code. The modem model is TEK608A. The reference must be indicated without the zeros. Example: if you have 0000001234, enter 1234.
- If you placed the power cable a long time ago, re-power the modem and then re-power it again before proceeding to the pairing stage.
- After powering the modem, enter the reference in the application, then bring the sensor and modem together. The LEDs will start flashing immediately. If they do, continue to follow the procedure described in the application.
If not, consult the reset procedure in the FAQ. If you still can't solve the problem, please contact us.

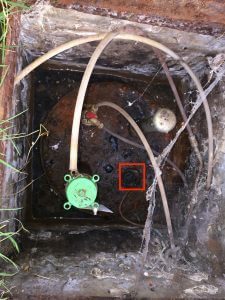
What is a sleeve?
The sleeve is the end cap on top of your tank. The sleeve is welded to the tank and is used to screw on a cap, a consumption sensor, etc.
Ultrasonic transducers tolerate a maximum sleeve length of less than 10cm, otherwise the ultrasound tends to ricochet and the signal is altered.
Which tank shapes and sizes are compatible with your automatic measuring system?
The sensors we sell are compatible with a wide range of tank types. We have developed solutions to cover over 95% of all tank configurations in Europe.
Above-ground vs. underground tanks
Our sensors are compatible with both overhead and underground tanks.

Compatible tank shapes
- Cylindrical tanks
- Oval tanks
- Cubic or parallelepiped tanks
- Other designs: contact us
Video explaining tank configuration: https: //youtu.be/43Y58WZPd1U
Maximum measurable dimensions
The maximum distance of our sensors depends on the model sold. Generally speaking, the maximum tank depth is around 3 meters. We have solutions that can measure up to 5 meters in industrial settings.
Compatible liquids
How to measure the consumption of an oval tank? Encoding dimensions.
Oval" tanks are not very common, but are perfectly compatible with our measuring system. These tanks are more common in the residential sector than in the industrial sector.
When installing our products, after checking connectivity, you will be asked to enter the dimensions of your oval tank. On this basis, the measured distance will be converted into volume. This encoding is simple and takes just a few clicks. However, you will need a measuring tape to measure the distances.
Here's a video explaining how to do it: https: //youtu.be/43Y58WZPd1U
Oval tanks
To encode the dimensions of your tank, simply select overhead tank and then oval tank in the application, as shown in the diagram below.

The distances shown on the diagram will help you estimate the total volume of your fuel oil, heating oil, rainwater tank, etc.

In terms of adapter size, the maximum valid height is 7 centimetres. Beyond this, the measurement may be altered, and it is advisable to drill into the tank to avoid problems of measurement instability.
How do I measure the power consumption of my cubic tank? Encode dimensions.
Cubic" or parallelepiped tanks are very common, and are of course compatible with our measuring system. These tanks are common in cellars, where they were sometimes welded in place.
During product installation, after checking connectivity, you will be asked to enter the dimensions of your cubic tank. On this basis, the measured distance will be converted into volume. This encoding is simple and takes just a few minutes.
Here's a video explaining how to do it: https: //youtu.be/43Y58WZPd1U
Cubic tanks
To encode the dimensions of your tank, simply select overhead tank and then cubic tank in the application, as shown in the diagram below.

The width, length and height are required in order to evaluate the exact volume of your fuel oil, heating oil, rainwater tank, ...

In terms of sleeve size, the maximum validated length is 7 centimetres. Beyond this, the measurement may be altered, and it is advisable to drill into the tank to avoid problems of measurement instability.
Is it possible to encode the dimensions of my cylindrical tank?
Yes, cylindrical tanks are very common and are of course compatible with our measuring system.
There are actually two types of cylindrical tanks: vertical cylindrical tanks and horizontal cylindrical tanks. Both types are supported.
When installing the product, after checking connectivity, you will be asked to enter the dimensions of the measured tank. On this basis, the measured distance will be converted into volume. This only takes a few minutes.
Here's a video explaining how to do it: https: //youtu.be/43Y58WZPd1U
Horizontal tanks
To enter the dimensions of your horizontal tank, simply select overhead tank and then horizontal tank in the application. Tank diameter and length are requested as shown in the diagram.


In terms of sleeve size, the maximum acceptable length is 7 centimetres. Beyond this, the measurement may be altered, and it is advisable to drill into the tank to avoid problems of measurement instability.
Vertical tanks

These tanks are listed in the overhead tanks category. If your tank is underground and of the vertical-cylindrical type, go to the overhead tanks category.
Tank height and internal diameter must be estimated. These values can be modified later if the data do not match.

In terms of sleeve size, the maximum acceptable length is 7 centimetres. Beyond this, the measurement may be altered, and it is advisable to drill into the tank to avoid problems of measurement instability.
What information is available on the application?
The mobile app makes it easy to manage your oil tank. The application is available as a web version (without installation on your phone; via app.fullup.be) and as an app (see the app store).
Here are the main features available:
- View tank consumption
- Check tank level
- Sharing the tank with another person
- Receive notifications when tank level is low
- Receive filling offers
The application allows you to consult all this information on a tank-by-tank basis for an unlimited number of tanks.
Here's a short video on how to use the application: https://www.youtube.com/watch?v=ZvrM-7pt-XY&t=14s
How do I adjust my notification threshold?
To adapt your tank's notification threshold, follow the steps below:
- Connect to the fullup application via your phone or the web version
- Select the gauge you have installed
- Top left
- You'll see a "notification threshold" tab. Click on the number indicated to modify the notification threshold (yellow zone in the image).

It's done!
Does the gauge warn me when my tank level is low?
Yes, via the mobile app you'll receive e-mail notifications as soon as the level falls below a certain threshold you've set.
Is it normal for the orange LED to be on all the time?
Exactly! In case of problems, the red LED will blink!
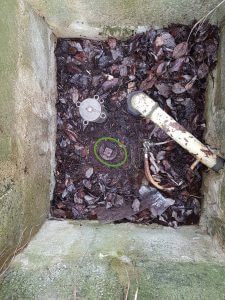
What is the chimney of my tank?
The chimney is the part of your tank that protrudes above the useful volume (the volume containing the fuel oil). Why do we need to know its height? Because without it, you'll miscalculate the total volume of your tank. On a classic cylindrical tank, the chimney is located on top, is square in shape and generally accommodates various inlets. Its height generally varies between 5 and 15 cm. This is the visible part of your tank (the top), accessible at the bottom of the inspection chamber.
If you have no way of measuring it, it's best to count wide (10 cm) to give yourself a safety margin. If the volume given by the application doesn't correspond to the volume your tank is supposed to make, you can enter another value until you find the exact volume.
How do I calibrate the gauge for my tank?
When you install the application, you need to enter the specific dimensions of your tank. For users of underground tanks, please refer to the section "How can I install Fullup on my underground tank if I don't know its dimensions".
How do I encode the dimensions of my tank?
Encoding tank dimensions is easy. Here's a video explaining how to encode your tank dimensions: https: //youtu.be/43Y58WZPd1U
We invite you to consult the Fullup application guide, which includes a section with the steps to follow depending on the design of your tank. Follow the images for the dimensions shown.
How do I (re)connect the modem and gauge?
When installing your Fullup product, after connecting the Fullup modem to your Internet box, you must pair the Fullup modem with the Fullup gauge. This is necessary so that the gauge data can be sent from the gauge to the modem, and then from the Fullup modem to the Internet via the cable connected to your Internet box.
The pairing procedure is explained in detail in the following video:
If you lose the signal, don't hesitate to perform this operation.
What is the transmission range between the gauge and the modem?
The range is 150 m in the open air with no obstacles. Depending on insulation and the number of walls, this will decrease. However, most of our customers have an installation with one or two walls in between, or a steel plate for underground tanks.
Why didn't the delivery man put in all the cash?
There may be several explanations for this measurement error:
- the tank dimensions are not quite right (tanks are often slightly larger than the dimensions given)
- the size of the tank sleeve (where the gauge is placed) is not exact
Please check the tank dimensions carefully.
In order to be sure of the amount of liquid in the tank, and to be sure that XXXL remained before filling, for example, it would be interesting to try measuring manually.
How can I retrieve oil level information and integrate it into my Fibaro home automation module?
Fibaro is a home automation module that allows you to monitor and control a whole range of devices in your home. They offer relatively inexpensive modules that will keep the more tech-savvy among us busy on Sunday afternoons.
Fullup doesn't offer official integration on the module, but some of our users have managed to extract information from fullup so that you can display your tank level information in your Fibaro management panel. Thanks to them!
Below is the link to this unofficial page: https://www.domotique-fibaro.fr/topic/13407-r%C3%A9cup%C3%A9ration-du-volume-de-citerne-mesur%C3%A9-par-une-sonde-fullup/
How is my consumption calculated?
Your consumption is calculated on the basis of the change in volume assessed each day. If a decrease in volume is observed, your consumption is increased. Weekly consumption is calculated by adding up daily consumption.
When filling more than 500 liters, the consumption algorithm detects a filling and restarts the algorithm from this date.
At present, the filter algorithm does not yet interact perfectly with the consumption algorithm, and outliers (volume variations linked to sensor error rates) can generate inconsistencies. Our engineers are working on this point.
In the meantime, you can also consult dashboard.fullup.be to view your consumption graph.
Installation: What do I do if I run out of tank openings?
To be able to install an ultrasonic level sensor, you need a vertical location where you can attach the sensor to the top of the tank.
To find out whether you have a slot for screwing in the sensor, go to the bottom of this page.
If you don't have an orifice available on your tank
If you don't have an orifice on your tank, you have two options:
- Either your tank is made of PVC and contains no flammable liquids (non-ATEX), in which case you can drill directly with a hole saw and then screw the sensor into the tank.
- Or your tank is not made of PVC, in which case you'll need to call in an installer. Depending on the situation, he will perform one of the following tasks:
- Connect the boiler flow and return to a single inlet to free up an opening and install the gauge.
- Drill into the tank using suitable equipment, then weld a sleeve vertically so that the sensor can be installed flush with the tank.
What space is available on a tank?
Tanks generally contain up to 4-5 external ports. These ports are used for a variety of purposes: feeding your boiler, filling the tank, venting the tank, an overflow protection system / siflet or for ... nothing at all, just a plug.
Usually, a hole is plugged with a stopper and can therefore be used to install the ultrasonic transducer.
Happy installation!
